Yes! I just had my Final Review, and I passed!
I was also given some excellent tips on how to improve my demo reel, to give me a more competitive edge. In any case, here's my reel as I presented it today. I'm proud of all the hard work I've done!
Enjoy, and thank you for following this blog!
Thursday, December 8, 2011
Saturday, December 3, 2011
Reel Nearly Done
My final review is in less than a week!
I'm just about done rendering out all the scenes for my reel as well. I thought I was done, but noticed a glaring problem in the final turntable. Because of an issue with displacement maps, the use background material, and needing to render hair out in a separate layer, there are obvious gaps in Coconino's fur when Creed passes in front of him. One hundred eighty two frames should fix it: 91 of the coyote's fur redone, and 91 of Creed without anything else. The fur will go above the current top layer, and Creed will go over that, and the gaps will be filled in.
If you're not a 3D artist and that made sense to you, then kudos. :)
Once those layers are done, I don't think I need to render anything else out. I have a correction or two that I can make on a few frames in Photoshop or directly in After Effects, though. Then, I'll set up the end credits, and voila! Demo reel!
AAU final reviews for online students are held in an online video chat room. They'll be able to watch the reel, and I"ll be able to upload and show the final Power Point presentation about the project.
I'll report back when it's done!
Monday, November 21, 2011
Wrapping Up
This is an interesting time for me. It's rather amazing that I have only four weeks left of my Academy of Art University education! So, I'm busy rendering Bodacious Creed, which is coming along well. I'm rendering out the second of three scenes.
It was going so slowly at first. I realized that to get it done in time, I needed to get a laptop. With my desktop being about three years old, the laptop is rendering faster. It's great to have two computers rendering this out at once and has already saved me a lot of time. Now, I feel like I can go back to Scene 1 later and render out another turntable or two, to add to the reel.
I'm rambling, aren't I? Anyway, what else?
I've been applying for a lot of freelance jobs. I won the bid for a small job, and have been working on that. Hopefully, that will lead to more work. I've also gotten encouraging replies on jobs that I haven't received. I have ideas for two classes I would like to teach at the community center, too. Once this reel is finished, I'll be able to start applying to studios.
For my thesis, I also wrote the final review of my thesis work, and sent that off for professional printing, and have done prints of some of my work. I will send all this to the academy later in the week for their archives, along with what I have finished of the demo reel. Once the final reel is done, I will submit it online for my final review on December 8.
So, that's about it for now. I will probably not do another vlog until my demo reel is finished.
Tuesday, November 1, 2011
So Close to Finished
I hope everyone had a blast for Halloween! Ours was certainly fun.
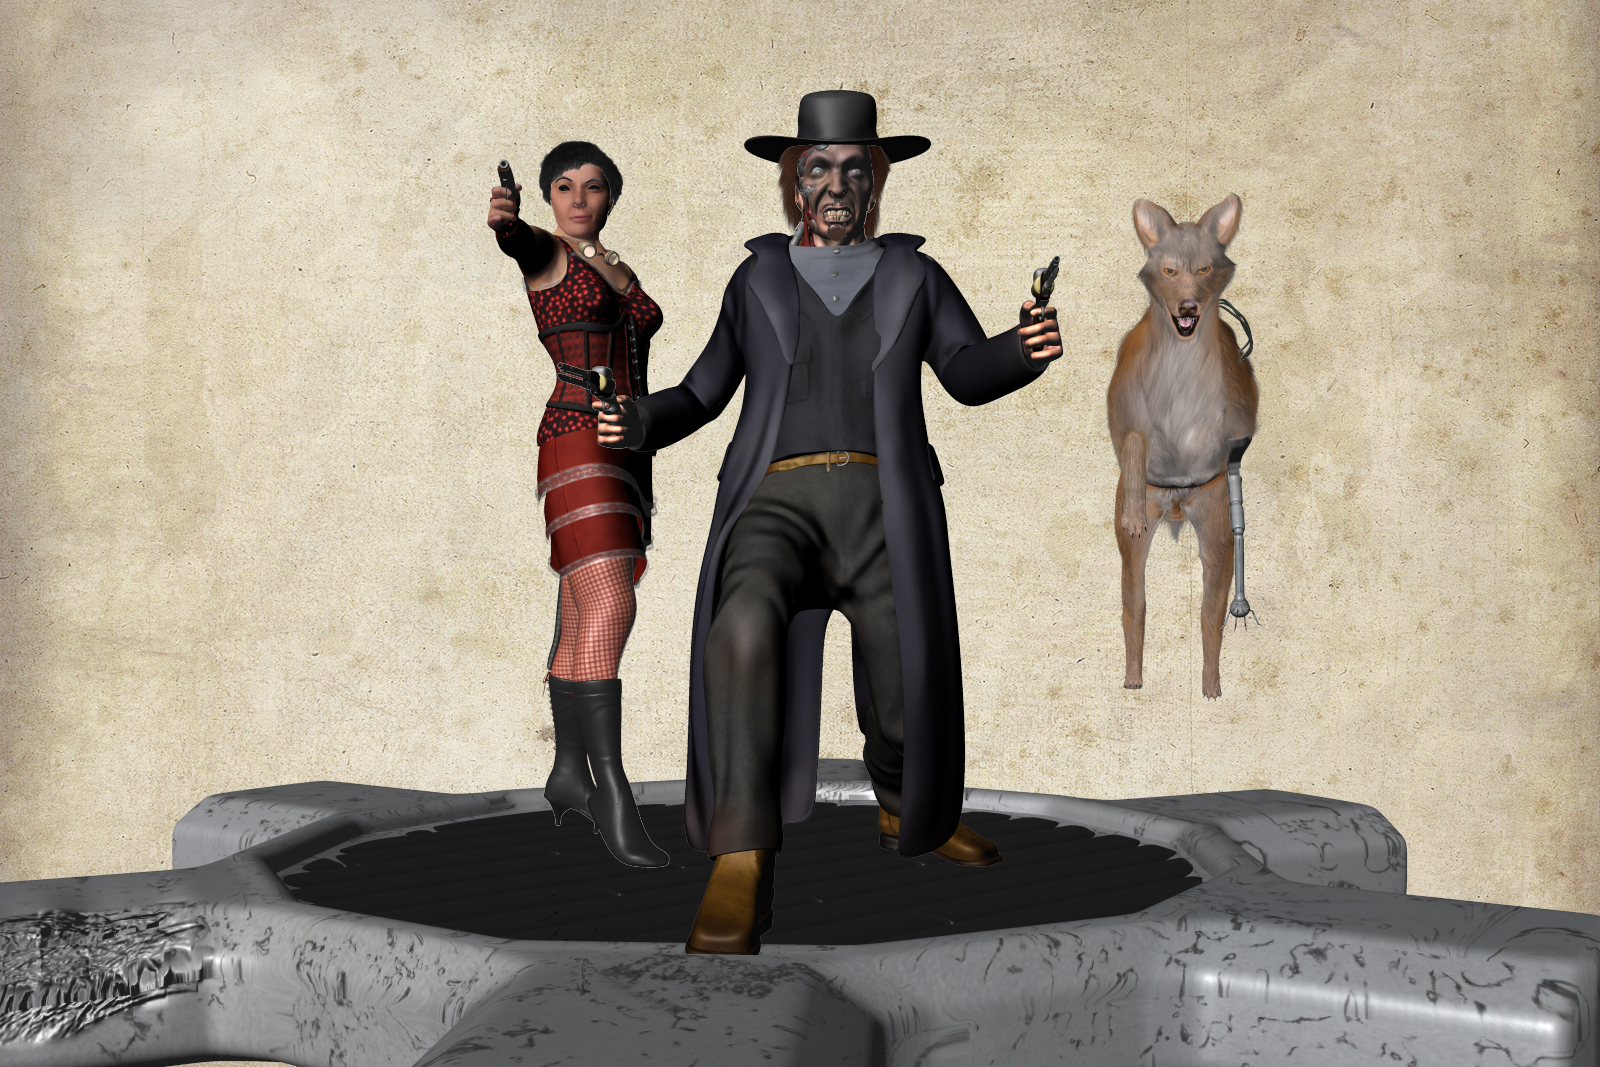
Anyway, on to Bodacious Creed. I'm happy to say that I am in the polishing-up phase. Here's an image I rendered last night. The background is from my midpoint presentation, and I will probably use it in the demo reel.

This preview of Scene 3 shows how far the project has come. It also shows that I have lots of examining and tweaking to do! For instance, in this image alone, Anna's eyes are inexplicably black (I haven't tracked down why yet), and her clothes need wrinkling. Creed's duster is poking into his shirt, and he doesn't have any eyebrows.
Today, I've fixed the duster problem, and went around the model in this scene, making sure there was no unwanted overlap. I also worked quite a bit on his right cheek area, making the hole look more believable, adding a more wounded, rotted look to his gums, and made sure his jaw and teeth looked right together.
Aside from needing to do the wrinkles in Anna's clothes, the major modeling is done. I may add some variety and interest to the base. I'd actually like to have three similar bases, with some interesting variation, and to add a few more props.
Since my final review is on December 8, I should have time to do all that, unless I get stuck on something.
Yep, December 8! If you've been reading this blog since the beginning, you've seen this go from, "I have a modeling thesis to do, and I need to come up with ideas," to the idea for a Steampunk/Western project, to adding the Horror element and refining it, to pre-production, including my working with concept artist Josh Stewart, to the production phase of modeling and texturing, to well, now, almost done!
And, as always, more soon!
Anyway, on to Bodacious Creed. I'm happy to say that I am in the polishing-up phase. Here's an image I rendered last night. The background is from my midpoint presentation, and I will probably use it in the demo reel.
This preview of Scene 3 shows how far the project has come. It also shows that I have lots of examining and tweaking to do! For instance, in this image alone, Anna's eyes are inexplicably black (I haven't tracked down why yet), and her clothes need wrinkling. Creed's duster is poking into his shirt, and he doesn't have any eyebrows.
Today, I've fixed the duster problem, and went around the model in this scene, making sure there was no unwanted overlap. I also worked quite a bit on his right cheek area, making the hole look more believable, adding a more wounded, rotted look to his gums, and made sure his jaw and teeth looked right together.
Aside from needing to do the wrinkles in Anna's clothes, the major modeling is done. I may add some variety and interest to the base. I'd actually like to have three similar bases, with some interesting variation, and to add a few more props.
Since my final review is on December 8, I should have time to do all that, unless I get stuck on something.
Yep, December 8! If you've been reading this blog since the beginning, you've seen this go from, "I have a modeling thesis to do, and I need to come up with ideas," to the idea for a Steampunk/Western project, to adding the Horror element and refining it, to pre-production, including my working with concept artist Josh Stewart, to the production phase of modeling and texturing, to well, now, almost done!
And, as always, more soon!
Saturday, October 29, 2011
Working Out Details
It's late, and I need to get to sleep! But I also wanted to write a quick post.
I have a new vlog up that talks about how I tackled a couple of fine tuning issues for my demo reel.
My final review is scheduled for December 8! I'm excited, because it's both coming quickly, and I know I have time to get everything done and have a fantastic demo reel.
My final review is scheduled for December 8! I'm excited, because it's both coming quickly, and I know I have time to get everything done and have a fantastic demo reel.
Sunday, October 16, 2011
Tedium
Don't get me wrong based on the title of this blog entry. I love 3d modeling, sculpting, and texturing. But right now, what's taking most of my project time as I set up Bodacious Creed for Scene 2? Is it sculpting the wrinkles into his clothes? No. Is it getting his finger nails in place? No. It's transferring the textures from the GoZ default directory that zBrush creates over to the proper Maya directory, and re-setting up all the shading connections.
I also checked to see if there's a way to specify the path for zBrush when it exports files to Maya this way, but I couldn't find anything. So, it's really time consuming.
Seems like something I should let Pixologic know about, a change to request for the next update.
I also checked to see if there's a way to specify the path for zBrush when it exports files to Maya this way, but I couldn't find anything. So, it's really time consuming.
Seems like something I should let Pixologic know about, a change to request for the next update.
Wednesday, October 12, 2011
Current Thoughts
I'm approaching the end of this project! Right now though, the next focus point is getting the scenes set up and posed. I plan, and hope, to have that done by October 31, giving me at least 21 days to render out the demo reel. Rendering can take a LONG time. I suppose if I were able to get a new computer, that would help. My computer is good, but it's nearly three years old. Any increase in speed would be fantastic.
I talked about Coconino's fur in the last vlog. (Check the previous blog entry to see that.) I had set it up as one hair system, all over his body. It became clear to me after working with it that I needed better control of each area, so I redid it that way. Now, there are several hair systems: 1. The torso. 2. The legs. 3. The head. 4. The tail. 5. The feet. and 6. The inner ears. Fortunately, in working on the fur before, I had already created root and tip color maps (again, see the last vlog), and while they need a little tweaking, they look pretty good and it was easy to plug them into the new hair systems. I expect to have Coconino's fur done and looking awesome by tonight.
Speaking of fur and hair, I'm not satisfied with Anna's. Though I'm getting pretty good at Shave and a Haircut, I'm really a modeler first, a texture artist second, and not really a hair guy. That's an extra thing that certainly enhances my work, but if it gets too complicated, well, I'm not quite at that level yet. Short hair styles like Creed's are easy enough. Fur like Coconino's is more complex, but still fairly short and manageable. Anna's long hair though is just very tough to get right.
So, I was thinking, why not give her short hair? Yes, it's the Wild West, but it's also a Steampunk world. I'm going to see if I can find some examples of short hair on women in the Wild West, and if I can't find that, I'll just give her a short hair style anyway. When I started on her hair, it was short at first, and it looked really good. If nothing else, it will make her look more like the independent individualist she is.
That's all my news for the moment. Back to work on the coyote!
Tuesday, October 11, 2011
First Scene Preview Turntable & More
I'm pretty happy with the work I got done this weekend. I rendered out a test turntable of Scene 1, posed Coconino for Scene 2 and 3, and have been working on Coconino's fur.
You can see all that in this vlog:
You can see all that in this vlog:
Friday, October 7, 2011
First Scene Posed!
Except for a bit of work, Scene 1 is done, and I'm ready to pose Scene 2!
This is the scene where Anna revives Creed after installing machinery in his body. And, he's a little surprised, to say the least.
This is the scene where Anna revives Creed after installing machinery in his body. And, he's a little surprised, to say the least.
Wednesday, October 5, 2011
And, the Vlog
Here's the video I mentioned, showing how I copied the wound layer over to the main mesh for Bodacious Creed.
Jonny's Creature Shop: New YouTube Channel
Illustrators keep a sketchbook. (Actually, a lot of artist do, myself included. But to make my point...) Digital quick sculptures are to 3D modelers what sketches are to illustrators. They're a great way to improve skills, stay loose, stay in practice, and to exercise creativity.
With the introduction of Dynamesh in zBrush 4r2, I decided it was time that I started this. And, sharing my work is also something I enjoy, and that keeps me motivated.
So, I started Jonny's Creature Shop, a YouTube channel where I'll be showing off my creative sculpts, AND showing the process of sculpting them. I have two videos up already. Check it out!
For inspiration, a lot of the time I'll be using Fantasy Genesis, a terrific book that helps launch ideas for fantastical things.
Ready to Zoom Forward, and 204th Post
I made my 200th post recently, but didn't mention it! So hey, I guess I'll mention that this is my 204th post. This is the longest blog I've ever kept, and a comprehensive record of the work done on my 3D Modeling thesis.
As my readers know, I'm getting close to the end of it! I graduate with my MFA in December, and as always, am working hard on this project.
Last semester, keeping a to do/check list of steps, I got a lot of work done and kept strongly on track. I'm doing the same now. Here's the list I wrote up yesterday.
Bodacious Creed
To Do List
Scene 1:
1. Fit wound layer properly.
2. Finish object shaders.
3. Possibly do subdermal layer shader for Creed.
4. Base, tool table.
5. Render turntable.
Scene 2:
1. Pose Creed and Coconino.
2. Coconino's fur.
3. Batwing doors, frame.
4. Base.
5. Use Creed shaders from Scene 1 (except for normal/disp maps).
6. Render turntable.
Scene 3:
1. Pose Creed, Boyd, & Coconino.
2. Bar, shelf of bottles.
3. Base.
4. Use Creed shaders from Scene 1 (except for normal/disp maps).
5. Render turntable.
End/Finalizing:
1. Watch a bunch of demo reels.
2. Write detailed shot breakdown.
3. Render all shots for demo reel.
4. Composite demo reel.
This morning, I finished Scene 1: 1. I actually ended up projecting the texture for the wound layer onto the main mesh, as the wound layer was getting too unruly. Funny enough, it now looks more organic, more realistic, and avoids the whole geometry-passing-through-geometry look.
I'm going to upload a new vlog later today where I talk about the process. I recorded it yesterday right when I started projecting the texture over. Meanwhile, I'm exporting the textures from zBrush so that I can load them into Maya. Then, I'll go forward with Scene 1: 2 and get those shaders polished up.
Sunday, September 25, 2011
News of the Awesome
Mind, consider yourself blown! Boom!
Pixologic has done it again. zBrush 4 Release 2 (4R2 for short... sounds like a droid, right?) is coming out soon! Check out the videos here and here. I could tell you what's in them, but you really should see for yourself! I am going to have SO much fun working with this.
I do hope that 4R2 handles memory better than 4. That would be a huge help for my high polygon Bodacious Creed models.
And to make things even better, 4R2 is a free upgrade for all registered zBrush users. I mean, that just makes my frakin' day!
In Bodacious Creed news, Creed and Anna are both nicely posed for the first scene! They need some sculpting work, including getting parts of their bodies shaped up, and sculpting wrinkles into their clothes. Creed's shoulder guard got all twisted out of shape in the initial posing, so I'll be bringing in the non-posed version and getting that set on him properly. Oh, and I posed Anna down to her hands and fingers. This is something that's been tricky for me before, but yeah, I'm getting better. This time it was easy and looks really good.
I'll do my best to get another vlog out to you all in the next few days!
Oh, and in Couch Zombies news, I recently made a very short video introducing the Phillip DeFranco show. PDF is a popular YouTuber who has asked fans to make intro videos. So, I hope he uses ours! And, here it is!
More soon...
Monday, September 19, 2011
Eager to Pose
I've been working a lot on the hair for Anna Lynn Boyd and Bodacious Creed, as you've read here and seen in my latest vlog videos.
I'm happy to say that I'm finally just about done with that phase, and ready to start posing the first scene!
I think that, until I do start on that scene, I'm going to feel like there's no end to this work. Yes, I'm sure I can get it done by late November, when I'll likely have my review. Still, actually bringing this into the posing phase will really help!
I'll share some images and maybe a vlog soon.
Friday, September 16, 2011
Hair: Problems and Solutions
Yesterday was LONG. I had two tricky software problems yesterday.
First, I was working on Creed's hair, but every time I went to render the scene, Maya would crash. I finally figured out what was causing the problem, after hours of Googling. A forum on Digital Tutors had the answer. It was a little tricky to follow though, so I created a tutorial on how to fix it.
After that, I transferred Anna in her work clothes from zBrush to Maya, complete with all the maps, and set up the skin shader on Anna's body. I set up a turntable, though when I went to render it, Maya wouldn't do it. I don't remember the original error. However, I updated Maya 2011 with the latest release, and then the batch rendering was even worse. (Batch rendering is when you create all the images for an animation.) Maya would simply report that the render was starting... and then that it was done, of course with no images rendered out.
After a few more hours, I went back to the former version I have of Maya 2011, and it worked fine.
Maya is a harsh mistress.
Actually, it kind of feels like Maya is a wife and zBrush is a mistress. I'm glad they get along so well.
Here are two new vlog videos! The first shows a bit of how I'll be working with Shave on Creed's hair, and the second is the tutorial on how to get the skin shader and Shave to cooperate.
Wednesday, September 14, 2011
200th Post!
It's hard to believe, but this is my 200th post to this blog!
I've just started working on the hair for Creed, and plan to do his, then Anna's hair, then start posing them for the first scene.
And here's my latest vlog, showing the work I've done over the past week.
With this being my last semester, we're well over half way through the blog, and the vlog. How many more posts do you think we'll have?
Tuesday, September 13, 2011
Hard Surface Stuff
You've been reading my books on your Kindle, yeah? Well if you're not buying those, how can I count on you to read Bodacious Creed? Give me some incentive to write the book! If you can pay $8.00 to see a movie, you can pay $2.99 to read one of my novels.
Anyhow, that's enough berating my friends for the day! Of course I'm playing, but I did work hard on those books and would like people to enjoy them.
But, on to the subject at hand, hard surface models for Bodacious Creed!
The first scene I'm going to set up is of Creed on Anna's operating table. As we know, she's a brilliant inventor who has started working in prosthetics and raising the dead. Damn, I really should write this story. Anyway, Creed is on the table, and Anna resuscitates him. He scrambles back on the table in shock, and she backs off, but tries to assure him that it's Okay. She didn't realize he would have such a violent reaction, or even that he would initially have the energy to move like that.
I won't be modeling the entire workshop, just what is necessary to see for the scene, somewhat like what you might see in a not-quite minimalist play. We'll have the table (based on Victorian operating tables of the time), some operating tools hanging from pegs, the floor, and perhaps a light source. I'll need to do my research on what other people have done for Steampunk lights, and put my own twist on that.
So, last night I started modeling the table. I'm working on that right now. It's fairly simple, but will have some nice detail in the form of the pegs and the texturing. I'm about to start on the texturing bit now. Time to find some of my good wood textures!
I have some turntables to share as well of Creed and Coconino. So, time permitting today, I'll get a new vlog out. If I don't have time, then in the next couple of days.
Wednesday, September 7, 2011
What I've Created Before
Before I dived headlong into digital art, I wrote fantasy books.
For awhile, I had them unpublished, but recently thought it would be fun to re-release the Kindle editions.
If you've been enjoying this blog, you might enjoy these reads!
Then, you can tell me if you think I should write a book about Bodacious Creed.
More thesis news soon!
For awhile, I had them unpublished, but recently thought it would be fun to re-release the Kindle editions.
If you've been enjoying this blog, you might enjoy these reads!
Then, you can tell me if you think I should write a book about Bodacious Creed.
More thesis news soon!
Monday, September 5, 2011
Coconino's Wires
So, you know the wires on Coconino, coming from the tubes on his back and such?
a) No? Well watch some of the latest vlogs.
b) Yes? I came up for what I think is a pretty sweet idea for them.
Obviously, I don't want them to be exposed wires. But they wouldn't have had rubber in the 1860s. Wires either, but this is Steampunk. The wires are a given. Rubber would be weird. Suspending disbelief is funny like that.
My first idea was to have them wrapped in denim. I even textured them like that, and they looked pretty cool. But then I realized, if he has to go through water, or it rains, he'd better be immune to the ether-converted-to-electricity, or zap! Dead coyote that now needs to be raised like Creed.
But hey, leather. So, I'm going to have them wrapped in black leather. Anna is a brilliant enough engineer to pull that off, and to make it very waterproof.
I'm going to texture them like that in a few. Right now I'm redoing the UVs on the wires, which is a tedious process. It's actually sort of meditative though.
Fall Semester Starts!
It started last Wednesday, and has been going pretty well. I didn't get the one-on-one instructor I requested, but Ann, who is terrific, is going to do my one-on-one again. Ann is an incredible modeler, and while she doesn't really do texturing or shading, she has a great eye for those things. With her eye, my texture and shading training, and any training I need from Digital Tutors, the end result of my thesis will rock.
I'm also taking Professional Practices for Animation, VFX, & Games, a class to help prepare students for the job market. I have a few essays to write for that. The first "week" of class is actually twelve days, so I'm going to get those written in the next couple of days.
Coconino is still coming along well. I've modeled his eyes and teeth, and am sculpting the teeth now.
More soon!
Sunday, August 28, 2011
Coconino, Much Progress
I said I probably wouldn't put up a new vlog until after the semester started, but I was wrong! So much for my powers of prediction.
Anyway, I did a bunch of work on Coconino, and here's the video.
Anyway, I did a bunch of work on Coconino, and here's the video.
Thursday, August 18, 2011
Coconino To Do List
Having to do lists for Bodacious Creed and Anna Lynn Boyd was a tremendous help last semester. It kept me organized and made it so much easier to get those models finished and ready for posing.
So, now that I'm trying to finish Coconino before next semester starts, I think another to do list is in order.
So far, I have done a fair amount of low level sculpting on the coyote, using all the references I can find. I've downloaded a lot of pictures of wet coyotes, because the matted down hair gives me a good idea of the underlying form. I'm also using general dog anatomy pictures.
Over the last couple of days, I've gotten the body fairly well shaped, but left the paws alone. The result is that they look very cartoony. So, I'm working on them today. After that, here's what I can think of that needs to be done next:
1. Get details to a higher level. Though Coconino will be covered in fur, it's still a good idea to have the body looking good.
2. Texture the body.
3. Create claw models.
4. Model the mechanical parts.
5. Create the eyes.
6. Texture everything.
That's all I can think of now. I'm leaving the fur for later, and I'm not sure I'll get to that by the end of summer, anyway.
Wednesday, August 17, 2011
Summer Semester Final Vlog!
Here's the new vlog! I said I'd do it, and it took awhile, but it's done. LOTS of turntables here, and the instrumental version of Jonathan Coulton's "Better." I've been wanting to record another version with some friends, but I don't know if we'll have time, so I removed the vocals from the karaoke version.
I probably won't do another vlog until after the new semester starts, but will likely post some more blogs.
Enjoy!
I probably won't do another vlog until after the new semester starts, but will likely post some more blogs.
Enjoy!
Thursday, August 11, 2011
Summer 2011 Semester - DONE!
Seven weeks goes SO fast! The summer semester is over, and I'm happy to say that I got a ton of work done on Bodacious Creed. This blog is a testament to that. Still, I have even more work to show soon. If I have time, I'll share some images tonight.
My work this morning was pretty simple. I sculpted in the button holes on Anna's new clothes. I also redid the UV map for her body.
Anyway, it was a great semester. I really enjoyed working with Ann, who gave me great tips on what is expected of modelers int he movie industry. It feels great to have gotten so much done as well, and to see my work improving and coming along more quickly.
The new semester starts on September 1! So soon!
Friday, August 5, 2011
This Morning's Work
So, this morning, I created the base meshes for Anna's work clothes: skirt, shirt, vest, and vest collar. I'll texture and sculpt them probably later tonight. In fact, I should have them done by tonight or sometime tomorrow.
I also noticed that her eyes look like they're bulging to me. I'm going to go over my reference photos, but I think I just need to pull them back very slightly in the head, then sculpt the eye lids around them a bit more, and maybe bring the eyelids slightly closer together.
If you pay attention to the vlog, you know that I use Jonathan Coulton's song "Better" as the theme music. I've been using this tune since early on in the thesis, and I also plan to use it as the background music for the demo reel. I'd like to do a cover of it with some of my friends, but I'm not sure if there will be time. So, just in case, I thought I'd see if I could have the vocals removed.
I found Online Vocal Remover, which did a great job of it. If you want vocals removed from a favorite song, give this a try! I might even subscribe, though right now, this is the only one I need. I had to mention them in this blog in order to download the song, BUT, it really did do a fantastic job. Check it out!
Thursday, August 4, 2011
Anna is Finished! Well, Mostly.
Well, what do you know? I think that Anna is done!
I made her eyes today, and I just got done fitting the eye area to them, and adding a little detail there. I don't want to go overboard on sculptural detail on Anna because she looks young, and is supposed to. While I added some sculptural bumping to her face, it didn't look quite right, so I removed it. I will probably add that subtle detail later in Maya with a bump map.
At this point, for the remainder of the semester (six days!) I plan to create her lab outfit, and if I have time after that, polish up some details on her and Creed. When the semester's over, I'll work on Coconino and hopefully have him done by the start of the Fall semester.
I'll do some blogs soon, but possibly not until the semester is over. Meanwhile, here's a picture of that eye area. (The eyes just look like white balls because what you're seeing there is a model for the glossy look of the eye.)

Speaking of eyes, I don't think I shared this. I added some detail to Creed's mechanical eyes that I think is a nice touch.

Anna is Finished!
Well, what do you know? I think that Anna is done!
I made her eyes today, and I just got done fitting the eye area to them, and adding a little detail there. I don't want to go overboard on sculptural detail on Anna because she looks young, and is supposed to. While I added some sculptural bumping to her face, it didn't look quite right, so I removed it. I will probably add that subtle detail later in Maya with a bump map.
At this point, for the remainder of the semester (six days!) I plan to create her lab outfit, and if I have time after that, polish up some details on her and Creed. When the semester's over, I'll work on Coconino and hopefully have him done by the start of the Fall semester.
I'll do some blogs soon, but possibly not until the semester is over. Meanwhile, here's a picture of that eye area. (The eyes just look like white balls because what you're seeing there is a model for the glossy look of the eye.)
Speaking of eyes, I don't think I shared this. I added some detail to Creed's mechanical eyes that I think is a nice touch.
Wednesday, August 3, 2011
Speedy Work
I really need to put up a vlog. The thing is, I've been getting a lot done on Anna, and it's going so well, I haven't bothered to take the time to put together a video showing what I've done.
But, when I do have time to make a new vlog, it will show a lot of great stuff!
We're already in module 13 out of 15, and module 14 starts tomorrow! So, just about a week left in this semester! My goal is to get Anna done by semester's end. If I don't, I'll get her done shortly after, but it's a good goal to shoot for. Once she's done, I'll only have Coconino, the coyote, to finish modeling. I plan to have him done by the time Fall semester starts, so that I'll go into that session ready to create all posed scenes and create the demo reel.
I'm working on the lacing for Anna's gloves now, so back to that.
Friday, July 29, 2011
Stick a Bolt in Creed, He's Done!
I finished the model of the my main character, Bodacous Creed! Woohoo!
Now, I'm on to Anna! I've already created lacing for the top of her blouse, textured her goggles, and started working on her inner mouth. I've re-purposed the gums and tongue from Creed, and reshaped them for Anna's mouth. I'll be giving them a new texture though based on the photographs of the "actress" used for Anna. And, I'm going to model her teeth from scratch. The "actor" for Creed has some quite unique teeth, so I don't want to reshape those. But, I'm happy with the topology of the tongue and gums, and there's no need to model those again.
I'm not done done with Creed, of course. I'll be posing him, re-sculpting parts that need it after posing, and refining the texture shaders for him in Maya. Some of the textures also need very minor tweaking that I can get to any time.
One problem I'm having is that, even when I crank the memory available to Maya for rendering to the point where I can't run anything else on my system, if I try to render all of Creed's parts at once, the render stops at anywhere from 20% to 50% in. I think the problem is that I have displacement maps on everything, and many of the items will look just as good with bump maps.
However, I do have images of various parts of the model, so I'm going to share those here.


Friday, July 22, 2011
Going Forward with Creed
I had a great talk with Ann tonight, who is happy with the work I've done over the last few days. She also agreed that the plan I described in my last post--separating out Creed's parts into several files--is a good one. In fact, a studio she worked for had to do that themselves on a particularly large environment model.
Yesterday, after a lot of work and software issues, I got the main metal parts textured. Today, I added texturing to the clothes, basically scuffing them up.
I have only a few more things to do before I can say that Creed is ready for the next stage, and move on to Anna!
Yesterday, after a lot of work and software issues, I got the main metal parts textured. Today, I added texturing to the clothes, basically scuffing them up.
I have only a few more things to do before I can say that Creed is ready for the next stage, and move on to Anna!
Oh, zBrush
I love zBrush. It's an amazing program that allows me to really detail my models and make them look fantastic.
However, I've run into a limitation, and possibly a bug.
The zBrush file for the character of Bodacious Creed is at about 2 gigs. Work on it is getting slower, which is understandable. There are a LOT of polygons in the individual models. I try to keep parts I'm not working on at their lowest subdivision level, but even so it gets bogged down. So, Okay, I can work with that.
What I haven't been able to work with are two things. Sometimes something simple, like painting a texture onto an existing mesh and then saving the file, will balloon the file up to over 6 gigs! The funny part though is that as the file saves, it will get that large, then jump down to 4.1 gigs when it's saved. I'm guessing there's a lot of data loss when that happens, though I don't know why it happens at all. In any case, that has got to be a bug.
The second problem is, even if these 4.1 gig files are complete, zBrush can't open them. I did some research, and it seems to be that 32 bit programs can't open files over 4 gigs.
So... Dear Pixologic, Please put out a 64 bit version of zBrush asap.
This means I need a work around, and this is what I'm planning. I'm saving various parts out to their own individual files. I have one with the mechanical parts, and one with the clothes. I'll put everything else in a third file. Once I've done all the work I need to on the individual parts, I'll export texture maps of everything, plus displacement and normal maps of everything hard surface. That means the guns, buttons, and all the mechanical parts, things that won't need further sculpting. The displacement and normal maps will contain all the high resolution detail information, so I'll be able to lower all those models to their lowest subdivision level, and delete higher subdivision levels.
My hope is that I will then be able to bring everything back into one file. From there, I should be able to set up poses and sculpt the organic parts.
I shouldn't have so many issues when I get to Anna or Coconino. Creed is by far the most complicated of the models. Sometimes you can just keep workin, and sometimes you need a work-around. I wish I could just keep working on Creed with all his models in one file, but I'm doing what I need to do.
Monday, July 18, 2011
Short List
I got some good work done on Creed's wounds and skin on Saturday! I'll include that in a vlog soon. Meanwhile, my to do list for the undead gunslinger is getting short! Here it is.
1. Mechanical parts
a. Texture.
b. Sculpt damage layer.
2. Clothes: scuff up so that they look worn in.
3. Holsters
a. Detail/sculpt.
b. Stitch.
4. Guns - texture metal parts.
I'm starting on the mechanical parts now. At the moment, I'm getting the numbers onto the dials of the brain interface unit.
Much of the metallic texturing will be done in Maya. But there are details to be done in zBrush and Photoshop, things that can be layered in with the metal, so I'm starting on that now.
We're in Module 9 already. Have I mentioned that summer semester just speeds by? Might have once or ten times. Just six modules left!
Thursday, July 14, 2011
Video On Its Way
I'm getting very close to having the Bodacious Creed model finished! I'm finishing up a new vlog showing most of the work I did over the last week, which includes a strap for the mask, more refinements and details on the body, buttons, and stitching.
Here's an updated list of what I still need to do.
1. Body
a. Refine wounds.
b. Add scab and fraying look to wound edges.
2. Wound layer: Give a more deathly look to the texture.
3. Skull: add sutures where scull plates are fused.
4. Mechanical parts
a. Texture. (Check on Digital Tutors to see if there's a handy tutorial to help me brush up my metal texturing skills.)
b. Sculpt damage layer.
5. Clothes: scuff up so that they look worn in.
6. Holsters
a. Detail/sculpt.
b. Stitch.
7. Guns - texture metal parts.
8. Finger and toe nails.
a. Shape, including shaping skin around them.
b. Texture.
Hopefully it won't take all that long! We're already in Module 8 of 15 for the summer semester... over half way through!
Speaking of semesters, I registered for the fall semester today. I'm also going to petition to graduate soon! I also plan to walk in the graduation ceremony in the Spring, as it's held just once a year. Who knows? Maybe I'll be living and working in L.A. at that time and have to come up to San Francisco for the ceremony!
Saturday, July 9, 2011
Temporalis Muscle
I had a great conversation with Ann last night. Very helpful! And she's happy with the work I've been doing on Creed, so that's awesome.
Oh, if I mention someone's first name here, check the right side bar. They're probably in it.
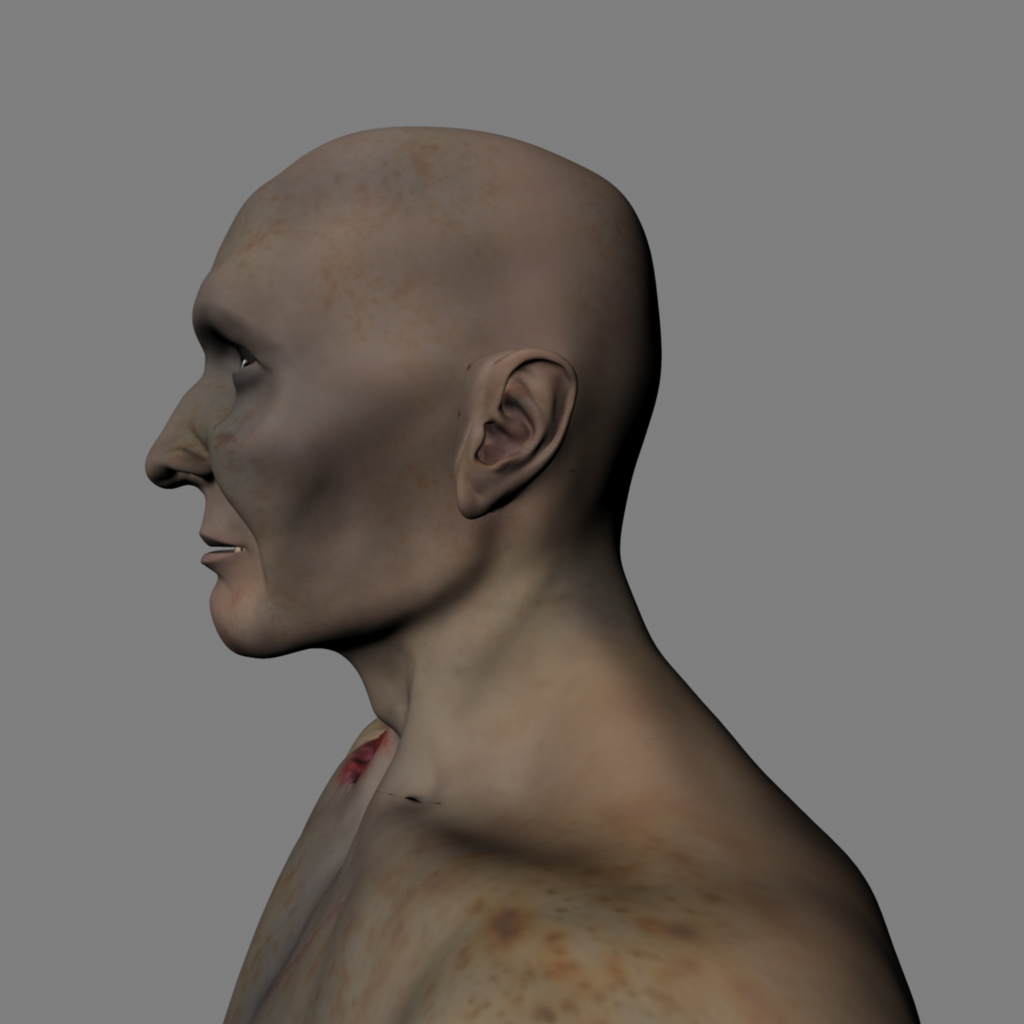
Anyway, just a small update now. I've been doing a LOT of work, and will share more soon. But here's a look at Creed's temporalis, visible through his wounds.

Oh, if I mention someone's first name here, check the right side bar. They're probably in it.
Anyway, just a small update now. I've been doing a LOT of work, and will share more soon. But here's a look at Creed's temporalis, visible through his wounds.

Friday, July 8, 2011
Checked Items
Focusing on one model at a time, and having a list of what to do on that model, seems to be speeding up my work. It's certainly nice to have that focus!
Here are checked off items since my last post.
1. Gums & Tongue
a. Separate tongue from gums.
b. Sculpt gums to fit teeth.
c. Texture tongue and gums.
3. Wound layer
b. Sculpt muscles.
4. Hat
a. Stitching.
b. Model & texture hat strap.
(Actually, after doing the stitching, the hat looked just right. It doesn't need a strap, and having a strap would, I think, really not add anything.)
7. Retexture neck muscles so they match the rest of the muscles.
8. Mechanical parts.
c. Reduce poly-count.
(I'm actually working on that part now. The "c" was not listed in the original to do list, but I talked with Ann, and she pointed out that they were really too geometry-heavy. Reducing the poly count while still having them look right is tricky, but I'm happy to say it's coming along well.)
So, that's where I am so far. Lots more to do!
Tuesday, July 5, 2011
The Big "US Martial Robert Creed" To Do List
I wrote this list today, to help organize and focus my work. As I've mentioned, I'll be concentrating on finishing Bodacious Creed himself first, then Anna Lynn Boyd, and then Coconino. Then I'll create the posed scenes that will appear in my demo reel. That will involve some polishing-up on all the models, but at least the major model-creation work will be done.
So, here's the big list for Creed. (I'm working on the mouth and tongue. As I write this, I'm bouncing them back into zBrush.)
Creed To Do List:
1. Gums & Tongue
a. Separate tongue from gums. (Ann suggested this, as it's how they do it in the movies.)
b. Sculpt gums to fit teeth.
c. Texture tongue and gums.
2. Body
a. Refine wounds.
b. Detail hands.
c. Detail feet.
d. Detail/fix texture on lips.
3. Wound layer
a. Make wounds look more "dead" through texturing.
b. Sculpt muscles.
4. Hat
a. Stitching.
b. Model & texture hat strap.
5. Mask
a. Get bolts into head, or...
b. Consider straps around head. Might look more "wild west."
6. Bones
a. Skull - add suture joint areas.
b. All - complicate textures & make slightly porous.
7. Retexture neck muscles so they match the rest of the muscles.
8. Mechanical parts.
a. Texture.
b. Sculpt damage layers. In the scene where he wakes up, the mechanical parts should look brand new. In the next two scenes, they should look more weathered.
9. Coat
a. Texture collar and pockets.
b. Sculpt and stitch collar and pockets.
10. All clothes - scuff up, make look worn.
11. Holsters
a. Sculpt into shape.
b. Detailing, including stitching.
12. Belt
a. Sculpt into shape.
b. Detailing, including stitching.
13. Guns
a. Texture
New Vlog!
I said I'd get it done! Here's the latest vlog, showing the hole in Creed's cheek and the inner mouth. Good stuff.
Monday, July 4, 2011
Trial and Error
That Bodacious Creed right cheek image from yesterday? Yeah, that's already old news.
As with so many other disciplines, there's a certain amount of trial and error that goes into 3D modeling. The method I used over the last two days to get that interior mouth view through Creed's right cheek was not working.
First, deleting polygons in Maya to create the hole actually made all my sculpting layers for Creed go away. The sculpting layers allow me to do things like switch his feet from regular to boot position, or to remove the sculpted in wounds. Layers allow for much greater flexibility if I want to change anything, in other words.
I didn't realize the layers had gone away though until I had done a bunch of work trying to sculpt the existing inner-mouth geometry. That wasn't working as well as I wanted it to either, but when I saw that my layers were gone, I had to think of a new solution.
So, this is what I've done today.
1. In zBrush, masked off the cheek wound where I want the hole to be, then reversed the mask so that any changes will only affect the cheek.
2. Pulled that cheek area a bit into the face, and then enlarge the cheek area. This causes the skin at the edges of the wound go fold in, giving the skin a look of thickness.
3. Send the main Creed mesh and the gums/teeth over to Maya from zBrush, for reference. Modeled the interior of the mouth as a new object. The mouth interior includes gums, tongue, and uvula.
4. Send the interior of the mouth back over to Maya for sculpting.
5. Deleted the old gums.
Now, here are a couple of future steps that will make this all work.
1. The black area on the cheek will be used to create a transparency map in Maya. In other words, it will be invisible.
2. Make most of the mouth/throat tube on the main Creed mesh transparent. That way only the new interior will be seen.
The funny thing is, now that I figured out this better method, the work is going really fast!
Sunday, July 3, 2011
Creed's Mouth
I'm going to have SO much to put in a vlog soon.
Today, I've decided to tackle the problem of the interior of Creed's mouth.
For an ordinary model, one doesn't have to worry too much about getting the inside of the mouth exact. It's generally enough to extrude the polygons inward from the lips, make sure there's some space in the mouth area, and extrude it down into the throat. Create teeth and gums separately, and it will look perfectly good for images and animation.
However, Bodacious Creed has a big hole in his right cheek. Fortunately for him, the main muscles are intact, but much of the skin had to be removed in bringing him back. Since you can see the inside of the mouth from that gaping wound, the interior has to look right!
I've never modeled the inside of a mouth in detail before. I expect this will be time consuming, but I also anticipate a really cool looking result.
Back to that now. I think after I've done this, and perhaps even textured it, that will be the time to create my next vlog.
Oh, here's an image of the work in progress, after I put the hole in his right cheek.

Saturday, July 2, 2011
Vlog?
I've been getting a lot done, and I've been meaning to create another vlog to show that work. I've just been too busy to get one finished! I've started several times, but I realize it's taking too long and too many takes, so I get back to the rest of my work. It's just easier to knock out a blog than a vlog.
So for now, here are some notes on what I've accomplished on Creed in the last couple of days.
1. Created the wounds mesh, and the wound areas on the body mesh now fold into these. Basically, it gives a more realistic look and has a lot more possibility for detailing. This involved copying the body model and deleting everything that wasn't wounds. I also turned off the wounds layer on the main mesh, deleted it, then re-created it so that I could carve the wounds in again.
2. I also redid the UVs on the wound mesh, for best texturing.
3. I created a new wound stitching brush for areas where Anna would have sewn Creed's skin together. Here's what that looks like, without the texture. Click on it to really see the details.

At the moment, I'm going to see what I can do about the hole in Creed's cheek. I've sent the body mesh over to Maya with GoZ. So, I'm going to get back to that now.
I'll try to get a vlog out soon!
Thursday, June 30, 2011
Focus
I had a great meeting with Chad today. He had an excellent suggestion, for me to concentrate on finishing one model at a time now. We're in crunch time here. I need to have the thesis, which means the demo reel, done by early to mid-December! The time does fly.
So, finishing up one model at a time is a way to focus completely on one task, then the next, then the next.
First, I'll finish Creed, then Anna, then Coconino. Compared to the first two, Coconino should be fairly easy.
In order to make Creed's wounds look more believable, I'm going to separate them out into their own sub-tool. There are a few ways to do this. I'm going to try this way first.
1. Duplicate the body model.
2. Delete the non-wound areas.
3. Push the wound areas on the main mesh inward, so that it really looks like there is a layer of skin, and a layer of muscle underneath.
On to that!
Wednesday, June 29, 2011
Coconino Base Mesh
The base mesh for Coconino has taken shape, and I'm just starting to sculpt him!
Anyway, more in the vlog:
Anyway, more in the vlog:
Saturday, June 25, 2011
Movie Musings
I've been getting a lot done since Monday, when the summer semester started. The thing is, it doesn't feel like I'm getting a lot done. That's the nature of any sort of artistic work, I suppose. It just takes longer than the artist estimates.
But yes, I am getting some done every day. And once I get the hang of something like clothes stitching or painting in muscles, those tasks become easier and faster.
I'll get a video up in my YouTube vlog soon, and talk more details about the progress of Bodacious Creed soon.
For the moment, I wanted to briefly address a related topic. Many writers and artists like to think about who would play their characters, if their project is ever made into a movie. I'm no different. I've been doing that game since I started writing short stories, then novels, years ago.
My dream duo cast for Bodacous Creed would be...
Hugh Laurie as US Martial Robert Creed
and
Anna Pacquin as Anna Lynn Boyd.
Can you see it? I can. :)
Tuesday, June 21, 2011
Early Summer Turntables
Here are the turntables I mentioned yesterday, in my vlog:
You can get an idea of how the stitching looks from this video, though here's some detail from the back of Creed's duster:

Here are Creed's and Anna's guns:


In addition, I"ve started working on the base mesh for Coconino, the coyote character. It's very basic right now, but I think the topology is good. You have to start from a good base to have a really good high resolution character.
And, since the semester is half as long as a regular semester, and it looks like Ann will be responding to my work frequently, I'll be posting my work to our class section daily. So, even though that mesh is super brand new, I've already posted it there.
More work to do now!
Monday, June 20, 2011
Summer Semester Starts Today!
Summer classes start today!
Now, as you know if you've been reading this blog, I have gotten some work done on Bodacious Creed over the last four weeks. Over the next seven, I'll have a ton more to do.
Yes, the summer semester is just seven weeks long! That's eight weeks less than a regular semester, which means all work must be done and in twice as quickly. Summer semesters are intense, but this isn't my first. I actually enjoy them!
Right now (literally in between writing this blog), I'm preparing my thesis materials to show what work I've done so far.
I'll show some of these in my vlog later, so keep an eye on the blog. I'll post it here!
Saturday, June 11, 2011
Books on the Wild West
I want to write a novel about Bodacious Creed. Of course, even if I do, the thesis comes first. This is a "if I have the time" thing. Even over my brief summer break, I'm working on the thesis, on a commission, and on a contest entry.
But in either case, the time period it's set in--the Wild West--has grabbed my attention. I just got a couple new books to read on the subject.
But in either case, the time period it's set in--the Wild West--has grabbed my attention. I just got a couple new books to read on the subject.
Saturday, June 4, 2011
A zBrush Quirk
This is more about stitching, or really any sort of zBrush detailing. It also probably won't make a lot of sense to anyone not familiar with the program. But the main point of this vlog is to document my progress and take notes on what I'm learning, whether others understand it or not.
I finished the stitching on Creed's jacket and pants. But then I thought about when I'll go through and add wrinkles, and I wondered how that would affect the stitching.
So, at the highest ordinary subdivision level (as opposed to the HD geometry), I sculpted over some of the stitching with the clay brush.
And the stitching was brushed away.
Damn.
Or so I thought.
Then I tried something else. The stitching was done in HD geometry, the clay just one subdivision level lower. What if I brought the subdivision level even lower than that, applied the clay brush, and then brought it back up to the highest?
Low and behold, that worked! The stitching remained detailed, and the shape of the clay went along with it just fine.
And, the truth is, most of the clothing wrinkles won't need to be sculpted at a high level of geometry, anyway.
For me, that means I can happily continue with the seams without worrying too much about how that will affect the wrinkles later on.
WHEW.
Tuesday, May 31, 2011
Clarification & a Tip
A fellow MFA candidate at AAU had a question for me recently, and a helpful resource. I paraphrase, but the question was basically, "You're not going to use the default zBrush stitching pattern, are you?" And the answer was, "No, I'm going to use some by Ryan Kingslien, and some I made. I was just using the default one to demonstrate techniques." He was concerned because you really want to get everything right and as professional as possible.
He also gave me this link, which shows five different stitching patterns and what they're used for. I created alphas for two of them, the Backstitch, and the Fishbone Stitch, both of which will be helpful in my thesis.
Still, I'm practicing doing the stitching. It's taking a bit of time to get everything looking right. Eventually (hopefully soon!) I'll get the hang of it and it will look good.
Here's the tip. It has to do with HD geometry in zBrush. What is HD geometry? Well, in zBrush, you can subdivide a mesh into as many polygons as your RAM will handle. The upper limit for my sub-tools is about 10,000,000 polygons. Lots, right? Funny enough, even at that resolution, details like stitching don't always come out sharp enough!
HD geometry is the zBrush solution. When you use it, it will isolate a section of the mesh and subdivide it further, but you can only work on a part at a time. The upshot is, you get to add in those fine details.
The drawback is that, if you want to delete higher resolution geometry and start over on those details, you can't.
So, what's the solution? How do you delete HD geometry from a mesh in zBrush?
The solution isn't obvious, but it's easy. Under Tool > Subtool, select the mesh you want to delete HD geometry from. Then click the "Duplicate" button. It will create a new sub tool without the HD details. Check both copies to be sure you know which is which, and then delete the one with HD geometry. Voila, you have a new copy, ready for new HD geometry and sculpting!
Oh! I forgot to mention earlier in this post, it looks like I have an instructor for my One on One Directed Study next semester! I'm excited. More as it develops!
Monday, May 30, 2011
Stitching Techniques
I'm at a point with Bodacious Creed's and Anna Lynn's clothing where I need to do a lot of stitching. I was actually looking at the models and getting somewhat overwhelmed, so I wrote a long to do list of what will come next, to make my life easier. Stitching on various clothing items comprised most of the list!
So, I started to figure out how I could make that flow more smoothly, and came up with some techniques. I illustrate them in this vlog entry.
So, I started to figure out how I could make that flow more smoothly, and came up with some techniques. I illustrate them in this vlog entry.
Wednesday, May 18, 2011
Rigging Demo
New video up!
The semester is quickly coming to a close. One of our assignments for Introduction to Rigging was to create a 15 second video showing a bit of what our rigs could do. I've included it in today's vlog. Enjoy!
The semester is quickly coming to a close. One of our assignments for Introduction to Rigging was to create a 15 second video showing a bit of what our rigs could do. I've included it in today's vlog. Enjoy!
Friday, May 13, 2011
Restoring Information
Huh... Blogger was down yesterday for awhile, and it looks like my last post disappeared. That sucks.
So, here are the latest two vlogs I've posted. Enjoy.
Here's the book I'm reading:
So, here are the latest two vlogs I've posted. Enjoy.
Here's the book I'm reading:
Thursday, May 12, 2011
Wednesday, May 4, 2011
Between Showings
Hey all you steampunk-western-horrorphiles. This entry is about things I've started working on for Bodacious Creed since the last entry, and things I plan to get done soon.
First, I had a great meeting with Chad Josewski, my directed study instructor this semester, and he helped me work some of this out. He also told me how to change the background from that black-to-gray gradient that zBrush usually has, to a solid midtone gray. You'll notice that in my last vlog, I used a white fog, which showed off some of the texture work better than the standard background, but sadly gave a hazy look to them as well. The flat gray looks much better, and I'll be using that in turntables from now on.
What I've done so far since the last video:
1. Evened out the base clothing textures.
2. Added the wood grain texture to the guns.
3. Put the Steampunk rose-in-circle-of-thorns symbol on Creed's gun. And I JUST realized that hearkens to another risen from the dead chap. That's cool.
4. Created the masseter and risorius muscles on the right side of Creed's face, and sculpted muscles and area a bit.
5. Went back to the concept drawings of Anna and changed the skirt from a single piece to three layered pieces. It fits more into the time period that way.
Some things I plan to do:
1. Create a hair prop for Anna, and possibly one for Creed. These will not be how I do the final hair. For that, I will use Shave & A Haircut. But that will get the shapes down. It will allow me to see how the hair will look, and help me to shape the actual hair when I get to that point.
2. Add more detail to the clothes, including seams, buttons, and so on.
3. Texture Creed's muscle and exposed areas. (Chad is also going to get me an écorché done in Maya to use as an anatomy reference, both for shapes and texturing.)
There's lots more to do of course, but those are the parts I'm going to focus on first. And soon, I'll get another vlog together to show my work!
Sunday, May 1, 2011
Clothing Texture Turntables
This week, I have a bunch of turntables for you, showing the base texturing work on my characters' clothing.
The reason the background is white, instead of black fading to gray, is because I'm using the fog effect in zBrush. For these turntables, it makes everything easier to see.
The reason the background is white, instead of black fading to gray, is because I'm using the fog effect in zBrush. For these turntables, it makes everything easier to see.
Friday, April 29, 2011
Free Flowing Modeling
Since I'm caught up with my rigging class, I just spent the last three hours working on my thesis. So fun! I'm going over Creed, and just doing whatever work I see that needs to be done. I did the basic texture for the shirt and pants, and redid the gunbelt UVs, as well as shaped the gunbelt a bit better.
During the summer, I'll be able to work like this a lot more, as I will have finished all my elective classes.
Still, it's hard to believe this semester is almost over. It's even harder to believe that I have only two semesters left, one the summer semester, and then I'll get my MFA!
I've started looking for work. I don't know how the market is for those of us who haven't graduated yet, but maybe I'll find something. If not, well, in December, I'll have my bodacious demo reel finished and I think that will open a lot of doors.
Tuesday, April 26, 2011
In the last week
... I've done more corrective blend shapes, and the blend shapes for Creed's facial expressions.
Today, I did the stitching on Anna's boots and created her finger and toe nails. Doesn't sound like a whole lot, but the stitching was fairly involved. The steps included creating a new boot stitching alpha (I didn't want to use the default one in zBrush), and a bunch of Photoshop work to get the texture of that looking pretty good. I think it will need more work as well.
Anyway, going for a walk, and I'll get more work done later.
Wednesday, April 20, 2011
Corrective Blend Shapes
One way that riggers and modelers work together is in the creation of blend shapes. In this video, you can see how I created a corrective blend shape to make Creed's arm bend more realistically for my rigging class.
Friday, April 15, 2011
Ides of April
The Ides of April... is that a thing?
Anyway, just some notes on what I'm working on today.
I've gotten just a bit behind in rigging, mostly because I'm not used to this level of detail in a rig and I've had to redo my skin weights several times. I know, excuses, excuses. Despite this though, I'm still pulling A's in the class, so I must be doing all right.
Anyway, I'll have some extra time over the week to catch up, and I plan to take advantage of that time. Here's some of what I'm doing.
1. Exporting the color and displacement maps for Creed's body from zBrush, so that I can use them in Maya. I'll also be using an sss shader (sub surface scattering) to make the skin realistic. Often on these shaders, a red base is used. I'll be using blue to give it that zombie look.
2. Going through a critique and help video that my instructor prepared for me. Apparently the spine twisting problems are related to one particular joint. Exclude that joint from having any influence on the skin, and the problem should be fixed. I'm sure it's a little more complicated than that.
3. Go through the rest of the Module 9 and 10 videos (we do one module per week) to get all caught up!
As for the actual modeling and texturing work for what will show up in my demo reel itself (aside from the models, the demo reel is the finished product of the thesis), I will continue to work on that as time permits. I'll probably finish the basic clothing textures for Anna first, then do Creed's clothes.
Speaking of which, I forgot to post this video from my vlog yesterday. I have no idea why, but YouTube isn't letting me embed it. I'll see what I can figure out, but meanwhile, see it here.
Tuesday, April 12, 2011
Some Rigging and Texturing
New video up! I'm making some sculpting and texturing progress on Anna's clothes. Enjoy.
Sunday, April 10, 2011
Learning Process
Pre-production. Remember that? I started this blog in the pre-production phase of my thesis, that time when I figured out and detailed what it would be all about. That's why this blog URL has jf-mastersthesis in it, rather than bodaciouscreed. That's when I created Creed, Anna, Coconino, and also some elements of their world that aren't even going to show up in the final demo reel. It's when I planned out what needed to be done to complete it.
And while pre-production is necessary for a coherent project, and for saving loads of time, it's amazing how the little things an slow work down. In the production phase, there's a lot of figuring out just how to do the things you planned.
For instance, I've started working on detailing my characters' clothing. Anna's bodice is a good example. I started by sculpting her blouse so that the bodice would be part of the sculpt. Then I decided it would make sense to texture it, and that in doing so I would see where more sculptural details were needed. But it didn't look right; it looked too attached. So, I scrapped all that work, and modeled a bodice to go over the blouse. That looks much better.
I started to texture it using Spotlight in zBrush. I've talked about Spotlight before. It allows the artist to project a texture onto a model and then paint it right on. But it wanted to make the black parts transparent. Plus, the shape of the painted area didn't look right. I then tried using zAppLink (also mentioned in here, or at least in my vlog) to paint the texture to the bodice, then lift that onto the actual model. That is mostly working, though mirroring it to the other side is a pain. But zBrush then acts erratic, sometimes not dropping the image to Photoshop, sometimes not accepting the image back. Lots of program and computer restarts have been involved in that.
The thing is, I'm figuring out better and better how to do this right and make it look awesome. This is the process: try something, make a mistake, try something else. In doing so, I'm coming up with my own techniques. It will speed up the rest of the work (I hope). But this week, even with all the work I've done on this, I feel like I've accomplished very little.
When I do have things looking right, I'll post a new blog and vlog.
Monday, April 4, 2011
The Beauty is in the Details
I finished a whole heap o' work these last couple weeks. Here's a list of the things I did for the Bodacious Creed models:
1. Outline type details for Anna's muscles. (Women have thinner skin than men, so many structures are faintly visible on the surface. This sort of sculpting gives that impression.)
2. Fixed Creed's hands, arms, and feet. (They needed a few tweaks to make the anatomy look right.)
3. Modeled Creed's mask.
4. Retopologized Creed's shirt and pants.
5. Edited Creed's gun. (Before while it looked very Steampunk, those gears I put on it would get stuck in a real holster. Not something a gunslinger wants. So I made them more practical.)
6. Created base mesh for Anna's derringer.
7. Updated Anna's gloves, added garters, and skirt train.
8. Began sculpting Anna's blouse/bodice. (I have my weekly meeting with Chad today, and will ask him how it looks, and ask for pointers on that sort of sculpting of clothes. Then I'll dive into sculpting the rest.)
9. Made short knickers/old west panties for Anna.
10. Made Creed's gun belt and holsters.
More later, of course, and I'll try to do at least one vlog this week.
Wednesday, March 30, 2011
Anna's Derringer
Since my last post, I've been modeling pieces here and there for my thesis. These include the base meshes for Bodacious Creed's gun belt and holsters, Anna's dress train, and Anna's garters. I also did the base mesh for her derringer, which I'm pretty happy with.
Here it is. Hope ya like it.

Here it is. Hope ya like it.

Monday, March 21, 2011
150th Post!
Dang, this is the longest and most regular blog I've ever kept. That makes me happy.
So, I recently created the base mesh for Bodacious Creed's mask.
Why does he have a mask in the first place? When Anna decided to bring him back from the dead, she wanted to do what she could to make him strong and restore him to the heroic lawman he was before he died. She also wanted to give him an imposing visage. Fortunately, after just a few weeks buried, his body was in good shape for the ether energy she would use to refresh its functionality. Unfortunately, he still looked, well, dead. His machinery would keep him going, and his clothing would cover up most of his body, but a mask, imposing as she made it, would give the right first impression.
As the mask is just a base mesh here, it's rather simple, but it has the right creases and curves. But you can see more in the video.
I also talk about layers in zBrush. These are extremely useful for sculpting. I was mistaken about an aspect of how they work, and since I cleared that up for myself, I figured I'd demonstrate what I learned.
Oh, this is also my spring break! I'll be using this time to get ahead on my thesis work, as well as on my rigging.
150th Post!
Dang, this is the longest and most regular blog I've ever kept. That makes me happy.
So, I recently created the base mesh for Bodacious Creed's mask.
Why does he have a mask in the first place? When Anna decided to bring him back from the dead, she wanted to do what she could to make him strong and restore him to the heroic lawman he was before he died. She also wanted to give him an imposing visage. Fortunately, after just a few weeks buried, his body was in good shape for the ether energy she would use to refresh its functionality. Unfortunately, he still looked, well, dead. His machinery would keep him going, and his clothing would cover up most of his body, but a mask, imposing as she made it, would give the right first impression.
As the mask is just a base mesh here, it's rather simple, but it has the right creases and curves. But you can see more in the video.
I also talk about layers in zBrush. These are extremely useful for sculpting. I was mistaken about an aspect of how they work, and since I cleared that up for myself, I figured I'd demonstrate what I learned.
Thursday, March 17, 2011
Back Rigging, Hand Sculpting, and Creed's First Gun
New stuff! I feel like I'm jumping around, doing this part of my thesis, then that part... sculpting, then rigging, then making new clothes and props. The thing is, all these need to be done, and this is how I'm managing my time.
This video shows recent rigging, sculpting, and the base mesh for Creed's right hand gun. I'm not sure if I'm going to have both guns the same or not. It worked in The Dark Tower.
In other news, my new female resin model should come today. Can't wait! The more I work on my 3D models, the more I realize the many difference between male and female anatomy. This will be helpful in detailing Anna Lynn further, and in my future work.
Sunday, March 13, 2011
Creed's Gun
I just started working on Creed's guns.

In this image, you can see the Old West revolver I'm basing this first gun on, and the first couple parts of the gun. The hand in the scene came off the Creed model. I repositioned it where it is so that, when the gun is complete (with bounces between zBrush and Maya), I can resize it and parent it to the hand. Then, I can reposition the hand to where it was initially, moving the gun with it. When I then bounce the gun from Maya to zBrush, it will be in Creed's hand there as well. Cool, huh?
Detail will, of course, be done in zBrush. And I'm thinking that instead of a barrel, it will load clips. Steampunk style clips, of course! I'll be drawing inspiration for details from Josh's concept art as well as this cool book I recently got. Link below.
Detail will, of course, be done in zBrush. And I'm thinking that instead of a barrel, it will load clips. Steampunk style clips, of course! I'll be drawing inspiration for details from Josh's concept art as well as this cool book I recently got. Link below.

Creed's Gun
I just started working on Creed's guns.
In this image, you can see the Old West revolver I'm basing this first gun on, and the first couple parts of the gun. The hand in the scene came off the Creed model. I repositioned it where it is so that, when the gun is complete, I can resize it and parent it to the hand. Then, I can reposition the hand to where it was initially, moving the gun with it. When I then bounce the gun from Maya to zBrush, it will be in Creed's hand there as well. Cool, huh?
Of course, maybe I should put it in holster position. Oh well, a consideration for later.
Saturday, March 12, 2011
Bodacious Creed related Treasures
As you all have probably heard, Borders has had to file for bankruptcy. So, sadly, our local Borders is going out of business. The upshot is that the prices have been low and I've been able to get some good deals.
And, I've found some great books with a genre connection to Bodacious Creed. If you've been following this journal, you may well be a fan of steampunk of zombie fiction.
All three of these are books I got there recently.

And, I've found some great books with a genre connection to Bodacious Creed. If you've been following this journal, you may well be a fan of steampunk of zombie fiction.
All three of these are books I got there recently.
Subscribe to:
Posts (Atom)