Friday, July 29, 2011

Stick a Bolt in Creed, He's Done!

I finished the model of the my main character, Bodacous Creed!  Woohoo!

Now, I'm on to Anna!  I've already created lacing for the top of her blouse, textured her goggles, and started working on her inner mouth.  I've re-purposed the gums and tongue from Creed, and reshaped them for Anna's mouth.  I'll be giving them a new texture though based on the photographs of the "actress" used for Anna.  And, I'm going to model her teeth from scratch.  The "actor" for Creed has some quite unique teeth, so I don't want to reshape those.  But, I'm happy with the topology of the tongue and gums, and there's no need to model those again.

I'm not done done with Creed, of course.  I'll be posing him, re-sculpting parts that need it after posing, and refining the texture shaders for him in Maya.  Some of the textures also need very minor tweaking that I can get to any time.

One problem I'm having is that, even when I crank the memory available to Maya for rendering to the point where I can't run anything else on my system, if I try to render all of Creed's parts at once, the render stops at anywhere from 20% to 50% in.  I think the problem is that I have displacement maps on everything, and many of the items will look just as good with bump maps.

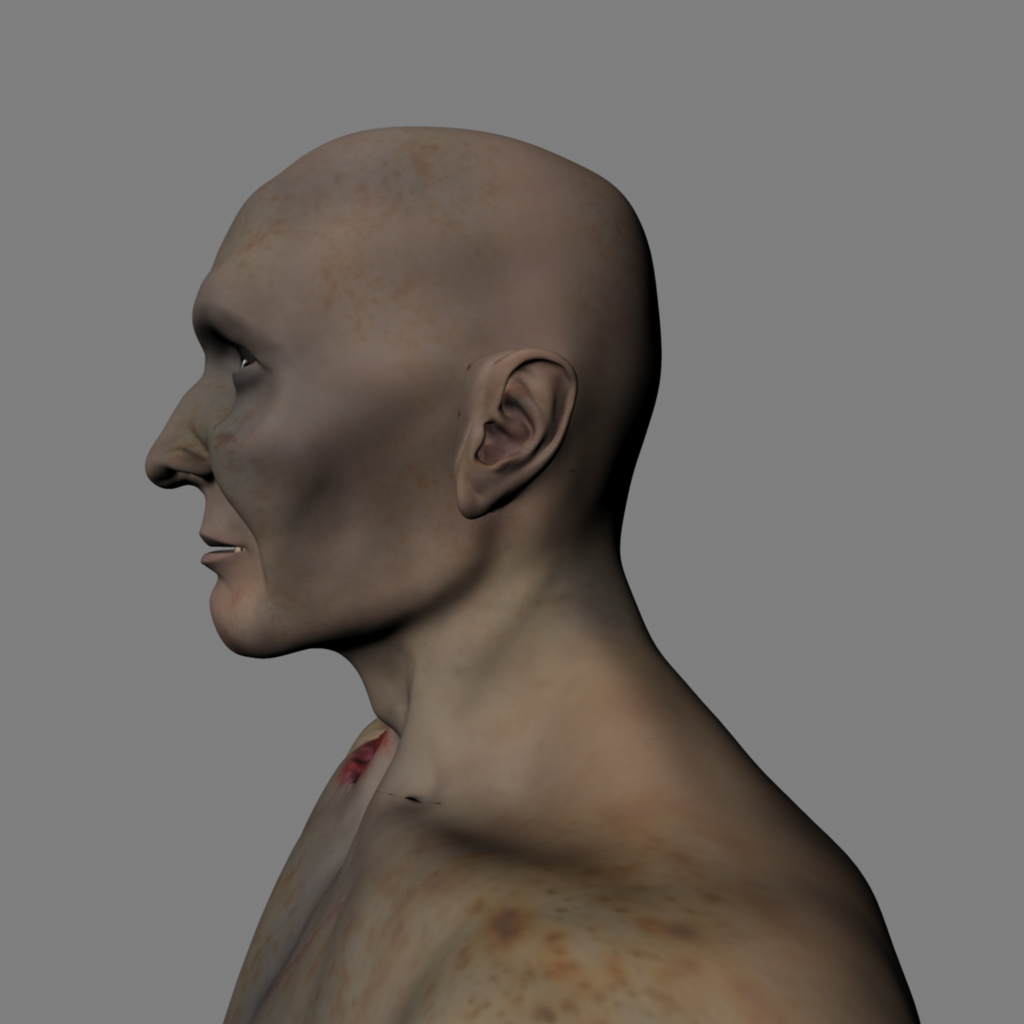
However, I do have images of various parts of the model, so I'm going to share those here.


Friday, July 22, 2011

Going Forward with Creed

I had a great talk with Ann tonight, who is happy with the work I've done over the last few days.  She also agreed that the plan I described in my last post--separating out Creed's parts into several files--is a good one.  In fact, a studio she worked for had to do that themselves on a particularly large environment model.

Yesterday, after a lot of work and software issues, I got the main metal parts textured.  Today, I added texturing to the clothes, basically scuffing them up.

I have only a few more things to do before I can say that Creed is ready for the next stage, and move on to Anna!

Oh, zBrush

I love zBrush. It's an amazing program that allows me to really detail my models and make them look fantastic.

However, I've run into a limitation, and possibly a bug.

The zBrush file for the character of Bodacious Creed is at about 2 gigs. Work on it is getting slower, which is understandable. There are a LOT of polygons in the individual models. I try to keep parts I'm not working on at their lowest subdivision level, but even so it gets bogged down. So, Okay, I can work with that.

What I haven't been able to work with are two things. Sometimes something simple, like painting a texture onto an existing mesh and then saving the file, will balloon the file up to over 6 gigs! The funny part though is that as the file saves, it will get that large, then jump down to 4.1 gigs when it's saved. I'm guessing there's a lot of data loss when that happens, though I don't know why it happens at all. In any case, that has got to be a bug.

The second problem is, even if these 4.1 gig files are complete, zBrush can't open them. I did some research, and it seems to be that 32 bit programs can't open files over 4 gigs.

So... Dear Pixologic, Please put out a 64 bit version of zBrush asap.

This means I need a work around, and this is what I'm planning. I'm saving various parts out to their own individual files. I have one with the mechanical parts, and one with the clothes. I'll put everything else in a third file. Once I've done all the work I need to on the individual parts, I'll export texture maps of everything, plus displacement and normal maps of everything hard surface. That means the guns, buttons, and all the mechanical parts, things that won't need further sculpting. The displacement and normal maps will contain all the high resolution detail information, so I'll be able to lower all those models to their lowest subdivision level, and delete higher subdivision levels.

My hope is that I will then be able to bring everything back into one file. From there, I should be able to set up poses and sculpt the organic parts.

I shouldn't have so many issues when I get to Anna or Coconino. Creed is by far the most complicated of the models. Sometimes you can just keep workin, and sometimes you need a work-around. I wish I could just keep working on Creed with all his models in one file, but I'm doing what I need to do.

Monday, July 18, 2011

Short List

I got some good work done on Creed's wounds and skin on Saturday! I'll include that in a vlog soon. Meanwhile, my to do list for the undead gunslinger is getting short! Here it is.

1. Mechanical parts
a. Texture.
b. Sculpt damage layer.
2. Clothes: scuff up so that they look worn in.
3. Holsters
a. Detail/sculpt.
b. Stitch.
4. Guns - texture metal parts.

I'm starting on the mechanical parts now. At the moment, I'm getting the numbers onto the dials of the brain interface unit.

Much of the metallic texturing will be done in Maya. But there are details to be done in zBrush and Photoshop, things that can be layered in with the metal, so I'm starting on that now.

We're in Module 9 already. Have I mentioned that summer semester just speeds by? Might have once or ten times. Just six modules left!

Thursday, July 14, 2011

Video Here

Here's the video I talked about in the previous post!


Video On Its Way

I'm getting very close to having the Bodacious Creed model finished!  I'm finishing up a new vlog showing most of the work I did over the last week, which includes a strap for the mask, more refinements and details on the body, buttons, and stitching.

Here's an updated list of what I still need to do.

1. Body
     a. Refine wounds.
     b. Add scab and fraying look to wound edges.
2. Wound layer: Give a more deathly look to the texture.
3. Skull: add sutures where scull plates are fused.
4. Mechanical parts
     a. Texture. (Check on Digital Tutors to see if there's a handy tutorial to help me brush up my metal texturing skills.)
     b. Sculpt damage layer.
5. Clothes: scuff up so that they look worn in.
6. Holsters
     a. Detail/sculpt.
     b. Stitch.
7. Guns - texture metal parts.
8. Finger and toe nails.
     a. Shape, including shaping skin around them.
     b. Texture.

Hopefully it won't take all that long!  We're already in Module 8 of 15 for the summer semester... over half way through!

Speaking of semesters, I registered for the fall semester today.  I'm also going to petition to graduate soon!  I also plan to walk in the graduation ceremony in the Spring, as it's held just once a year.  Who knows?  Maybe I'll be living and working in L.A. at that time and have to come up to San Francisco for the ceremony!

Saturday, July 9, 2011

Temporalis Muscle

I had a great conversation with Ann last night.  Very helpful!  And she's happy with the work I've been doing on Creed, so that's awesome.

Oh, if I mention someone's first name here, check the right side bar.  They're probably in it.

Anyway, just a small update now.  I've been doing a LOT of work, and will share more soon.  But here's a look at Creed's temporalis, visible through his wounds.

Friday, July 8, 2011

Checked Items

Focusing on one model at a time, and having a list of what to do on that model, seems to be speeding up my work.  It's certainly nice to have that focus!

Here are checked off items since my last post.

1. Gums & Tongue
     a. Separate tongue from gums.
     b. Sculpt gums to fit teeth.
     c. Texture tongue and gums.


3. Wound layer
     b. Sculpt muscles.


4. Hat
     a. Stitching.
     b. Model & texture hat strap.


(Actually, after doing the stitching, the hat looked just right.  It doesn't need a strap, and having a strap would, I think, really not add anything.)


7. Retexture neck muscles so they match the rest of the muscles.


8. Mechanical parts.
     c.  Reduce poly-count.


(I'm actually working on that part now.  The "c" was not listed in the original to do list, but I talked with Ann, and she pointed out that they were really too geometry-heavy.  Reducing the poly count while still having them look right is tricky, but I'm happy to say it's coming along well.)


So, that's where I am so far.  Lots more to do!

Tuesday, July 5, 2011

The Big "US Martial Robert Creed" To Do List

I wrote this list today, to help organize and focus my work.  As I've mentioned, I'll be concentrating on finishing Bodacious Creed himself first, then Anna Lynn Boyd, and then Coconino.  Then I'll create the posed scenes that will appear in my demo reel.  That will involve some polishing-up on all the models, but at least the major model-creation work will be done.

So, here's the big list for Creed.  (I'm working on the mouth and tongue.  As I write this, I'm bouncing them back into zBrush.)

Creed To Do List:

1. Gums & Tongue
     a. Separate tongue from gums.  (Ann suggested this, as it's how they do it in the movies.)
     b. Sculpt gums to fit teeth.
     c. Texture tongue and gums.
2. Body
     a. Refine wounds.
     b. Detail hands.
     c. Detail feet.
     d. Detail/fix texture on lips.
3. Wound layer
     a. Make wounds look more "dead" through texturing.
     b. Sculpt muscles.
4. Hat
     a. Stitching.
     b. Model & texture hat strap.
5. Mask
     a. Get bolts into head, or...
     b. Consider straps around head. Might look more "wild west."
6. Bones
     a. Skull - add suture joint areas.
     b. All - complicate textures & make slightly porous.
7. Retexture neck muscles so they match the rest of the muscles.
8. Mechanical parts.
     a. Texture.
     b. Sculpt damage layers.  In the scene where he wakes up, the mechanical parts should look brand new.  In the next two scenes, they should look more weathered.
9. Coat
     a. Texture collar and pockets.
     b. Sculpt and stitch collar and pockets.
10. All clothes - scuff up, make look worn.
11. Holsters
     a. Sculpt into shape.
     b. Detailing, including stitching.
12. Belt
     a. Sculpt into shape.
     b. Detailing, including stitching.
13. Guns
      a. Texture

New Vlog!

I said I'd get it done!  Here's the latest vlog, showing the hole in Creed's cheek and the inner mouth.  Good stuff.

Monday, July 4, 2011

Trial and Error

That Bodacious Creed right cheek image from yesterday?  Yeah, that's already old news.

As with so many other disciplines, there's a certain amount of trial and error that goes into 3D modeling.  The method I used over the last two days to get that interior mouth view through Creed's right cheek was not working.

First, deleting polygons in Maya to create the hole actually made all my sculpting layers for Creed go away.  The sculpting layers allow me to do things like switch his feet from regular to boot position, or to remove the sculpted in wounds.  Layers allow for much greater flexibility if I want to change anything, in other words.

I didn't realize the layers had gone away though until I had done a bunch of work trying to sculpt the existing inner-mouth geometry.  That wasn't working as well as I wanted it to either, but when I saw that my layers were gone, I had to think of a new solution.

So, this is what I've done today.

1. In zBrush, masked off the cheek wound where I want the hole to be, then reversed the mask so that any changes will only affect the cheek.
2. Pulled that cheek area a bit into the face, and then enlarge the cheek area.  This causes the skin at the edges of the wound go fold in, giving the skin a look of thickness.
3. Send the main Creed mesh and the gums/teeth over to Maya from zBrush, for reference.  Modeled the interior of the mouth as a new object.  The mouth interior includes gums, tongue, and uvula.
4. Send the interior of the mouth back over to Maya for sculpting.
5. Deleted the old gums.

Now, here are a couple of future steps that will make this all work.

1. The black area on the cheek will be used to create a transparency map in Maya.  In other words, it will be invisible.
2. Make most of the mouth/throat tube on the main Creed mesh transparent.  That way only the new interior will be seen.

The funny thing is, now that I figured out this better method, the work is going really fast!

Sunday, July 3, 2011

Creed's Mouth

I'm going to have SO much to put in a vlog soon.

Today, I've decided to tackle the problem of the interior of Creed's mouth.

For an ordinary model, one doesn't have to worry too much about getting the inside of the mouth exact.  It's generally enough to extrude the polygons inward from the lips, make sure there's some space in the mouth area, and extrude it down into the throat.  Create teeth and gums separately, and it will look perfectly good for images and animation.

However, Bodacious Creed has a big hole in his right cheek.  Fortunately for him, the main muscles are intact, but much of the skin had to be removed in bringing him back.  Since you can see the inside of the mouth from that gaping wound, the interior has to look right!

I've never modeled the inside of a mouth in detail before.  I expect this will be time consuming, but I also anticipate a really cool looking result.

Back to that now.  I think after I've done this, and perhaps even textured it, that will be the time to create my next vlog.

Oh, here's an image of the work in progress, after I put the hole in his right cheek.

Saturday, July 2, 2011

Vlog?

I've been getting a lot done, and I've been meaning to create another vlog to show that work. I've just been too busy to get one finished! I've started several times, but I realize it's taking too long and too many takes, so I get back to the rest of my work. It's just easier to knock out a blog than a vlog.

So for now, here are some notes on what I've accomplished on Creed in the last couple of days.

1. Created the wounds mesh, and the wound areas on the body mesh now fold into these. Basically, it gives a more realistic look and has a lot more possibility for detailing. This involved copying the body model and deleting everything that wasn't wounds. I also turned off the wounds layer on the main mesh, deleted it, then re-created it so that I could carve the wounds in again.
2. I also redid the UVs on the wound mesh, for best texturing.
3. I created a new wound stitching brush for areas where Anna would have sewn Creed's skin together. Here's what that looks like, without the texture.  Click on it to really see the details.


At the moment, I'm going to see what I can do about the hole in Creed's cheek.  I've sent the body mesh over to Maya with GoZ.  So, I'm going to get back to that now.

I'll try to get a vlog out soon!